I’ve previously written about Kodachi. The author is now working on a new version, and it doesn’t look any better. Let’s have a look for instance on the proposed authentication protocol.
It’s unclear where it will be used.
It’s unclear what it protects.
It’s unclear whom it authenticates.
Authentication Flow:
When a client attempts to authenticate, it contacts the server.
The server generates a cryptographically secure 256-bit (32-byte) random value using random_bytes().
This value is encoded as a 64-character hexadecimal string for transmission.
A unique CSRF token is attached with the challenge to prevent replay attacks.
Client-Side Processing:
The client reverses the string and applies a SHA-256 hash to solve the challenge.
Server-Side Verification:
The server validates the solution and, upon success, issues a session token.
Security Benefit:
No passwords are ever transmitted or stored, significantly reducing risk.
Good luck in making sense of this. And in addition, there’s a lot of unanswered questions:
How does the client authenticate the server?
What is the purpose of the random 32-byte nonce?
Why is a separate CSRF token needed in addition to the nonce?
How does applying a hash to a nonce solve a challenge? What challenge?
What solution does the server validate?
In short, I don’t see any authentication happening as part of this protocol, and I don’t see how it can be secure either. And why not transmit passwords? TLS solved this problem, and if the server is untrusted to handle a password, it’s untrusted to handle other secrets as well.
And why re-invent the wheel? There’s multiple protocols for authentication that doesn’t reveal a client side secret to the server, but proves client knowledge of the secret. TLS and SSH authentication are two such mechanisms. Schneier’s law is ever relevant:
Anyone, from the most clueless amateur to the best cryptographer, can create an algorithm that he himself can’t break. It’s not even hard. What is hard is creating an algorithm that no one else can break, even after years of analysis. And the only way to prove that is to subject the algorithm to years of analysis by the best cryptographers around.
The author of Kodachi has no credentials to go by; no published works on security, no known education on the topic, and no known prior work on authentication. There’s overwhelming chances of a broken authentication scheme. All this follows my prior criticism; there’s simply no reason to trust that Kodachi is secure. From what I’ve seen the author has no training in either software development or security. The way git is used is another clear indication of this lack of experience.
Note that I’m not claiming that I can do better. I probably can’t – but I’m not attempting. I’m aware of how difficult it is, and abstain from doing so.
But it doesn’t end there. There’s other gems in the design document:
The approach to security extends beyond authentication, incorporating continuous monitoring:
Network Monitoring:
Tools like iftop and nethogs are used to detect unusual traffic patterns.
Process Monitoring:
Applications such as btop and htop help identify suspicious resource usage.
Port & Bandwidth Tracking:
Port monitoring and vnstat are employed to reveal unexpected connections and anomalous data transfers.
Integrity of Running Processes:
Signature verification ensures only authorized code is executed.
How can a tool such as iftop and nethogs detect unusual traffic patterns? They’re made for discovery overall network bandwidth use or the biggest network users. A crucial leak may be hundreds of bytes per second, and won’t show up in such tools. A real IDS would be better. Again; proposing such tools shows lack of understanding.
btop and htop can help – but it requires intimate knowledge of what’s normal. Normal users will probably not be in that position.
What mechanism is used to define unexpected connection and anomalous transfers?
How is signatures verified? What mechanism stops unsigned code?
What patterns?
Furthermore, the present version, 8.27, is based on Ubuntu 18.04. It was released in February 2023. Ubuntu 18.04 was end of life in May 2023. Thus, Kodachi is recommending people to use software that has not been maintained for two years, and is no longer actively tracked. There is vulnerabilities in 18.04, but no-one tracks or patches them anymore. For a security focused product to not patch software for over two years is a deadly sin, and illustrates the problems of single developer when it comes to projects as complex as releasing a Linux distro.
Distros such as Debian and Ubuntu have teams of multiple people doing security patching and reviews – but more importantly: they have infrastructure for handling it, such as automated CI/CD systems that builds and distributes new packages once patches are approved. That infrastructure is a force multiplier; the developers no longer need to spend time on manually building stuff.
In short – the responsible thing would be to no longer offer an insecure product.
I’ve tried asking on the discord used by the project, but so far the only reply has been ad hominem.
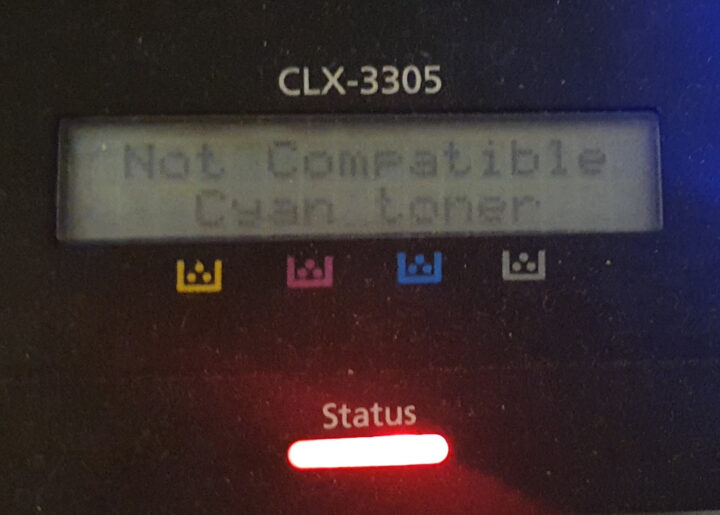
Some years back I bought a Samsung CLX-3300 printer. It worksworked great. Most of the time it was plugged into a RPi that was handling the spooling with cups, and I used third party toner without any issues.
Recently the SD card of the RPi died, so that option was not available to me any more. Yesterday, my wife had to print something, so she plugged her Windows 10 computer into the USB port of the printer. And presto – the display shows Incompatible toner – for all toner.
There’s no technical reason for this. The printer worked fine with exactly the same toner the day before. However, HP has obviously decided that this should not be allowed. It’s not a original move in the printer business.
It’s hardly original; printer manufacturers have been at this for years. The new thing here is that they modified the printer after it was purchased, without informing me. They didn’t provide any information that the firmware would be updated, and essentially lead to a Denial of Service.
I was recently made aware of Kodachi Linux, which according to it’s website has gotten critical acclaim. This is a superficial attemt to look at the distribution – if it’s even fair to call it that.
Off the bat, it doesn’t start well:
Confusing documentation
For best security results (Email – Banking – Cryptocurrency):
ISP > Linux Kodachi VPN with firewall forced VPN Traffic > Kodachi loaded browser > Dnscrypt
ISP > Linux Kodachi VPN with firewall forced VPN Traffic > Kodachi loaded browser > TOR DNS
ISP > Linux Kodachi VPN with firewall forced VPN Traffic > Kodachi lite browser > TOR DNS (Fast)
ISP > Linux Kodachi VPN with firewall forced VPN Traffic > TOR browser > Dnscrypt
ISP > Linux Kodachi VPN with firewall forced VPN Traffic > TOR browser > TOR DNS
This confuses security and anonymity. While the majority of such sites today employ TLS (https), sending traffic through unknown VPN’s and Tor may potentially send your traffic to an attacker. You have no knowledge of the motivations of people running tor exit relays, and while they may provide anonymity, they are not meant to provide security.
Furthermore, Warith Al Maawali, the author of Kodachi, openly admits to transferring a hardware hash by default, upon boot:
I pay monthly rent to run the VPS nodes and utilize them for VPN which is provided to you, I do not collect ANY data or store ANY information (Logs) that belongs to the user except the hardware ID (hash) and connected IP address (VPN IP) that has to be sent automatically when your PC establishes a connection to the VPN
How on earth did he conclude that it was a good idea to transmit a hardware hash on boot, for a security and anonymity focused distribution? I could accept it, if it only occurred after the user choosing to use his VPN. As it is, it automatically transmits it upon boot.
What is Kodachi
Kodachi is not what I’d call a distro. The repositories are simply the default Ubuntu repositories. It’s simply Ubuntu – with a theme and some shell scripts to manage the extra security features. This should be acknowledged more prominently in my opinion, especially given the somewhat dubious license he publishes. His code is not the OS; it’s a few shell scripts.
Networking disaster
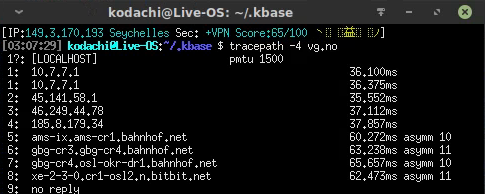
For IPv4, Kodachi at least manages to configure things correctly. A tracepath -4 vg.no indicates that yes, it does indeed go through VPN and possibly Tor:
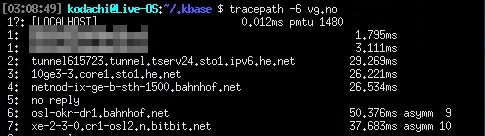
But for IPv6 it falls apart! IPv6 is enabled and functions. Note that I redacted first two hops as they’re inside my own network – but the third hop is the Hurricane Electric termination point for my IPv6 tunnel…
This is a devastating fault in a distribution attempting to provide anonymity! Unaware users may be trivially trackable through IPv6 – beliving the system uses the VPN’s they told it to use. Some packages that are included, such as youtube-dl will happily use IPv6 where available.
While I’m usually speaking warmly in favour of IPv6, at this point in time it probably makes more sense to just disable it totally, if your goal is anonymity. It’s a risk in this scenario, because the tools that work on IPv4 often is unaware of IPv6.
Furthermore, he seems to confuse dnscrypt and VPN. The desktop shows ISP->VPN->DNScrypt – which is… unclear. DNSCrypt is for ensuring DNS lookups, not network traffic in general!
Installed software
This section can be described as everything including the kitchen sink. It includes:
Audacity
Remmina
LibreOffice
OpenSSH server
GCC
Postfix (which is even enabled and listening!)
And much, much more.
This probably stems from the fact that this is a Ubuntu Live Image, with minimal modifications. But more software means a bigger attack surface. That’s probably not a good thing in a system focused on maintaining anonymity. Software such as popularity-contest is installed, although disabled. There’s no sane reason for this being installed!
Heck, even avahi is installed. Why would you want a piece of software made for announcing your presence on such an installation anyway? It simply doesn’t make sense. Removing it would make the system work as fine, and remove one potential problem.
This is the general problem here; everything is installed, and available. This allows the user to make mistakes without realizing their mistakes. Limiting options reduces the likelihood of such mistakes, and reduces the attack surface.
File encryption
File encryption appears to be provided by a custom Python 2.x script named lock.py, with a shell script wrapper named lock. lock.py appears to be a Python script written by Joe Linoff, although the creator of Kodachi gives zero references to using this piece of software, nor that he is not the creator. The script is released under a MIT License from what I could find. As far as I can tell, Warith Al Maawali, the creator of Kodachi, does not include this license – thus not abiding by the terms of distribution for lock.py.
This is likely the reason why he writes the following in his changelog:
I tried to move to Ubuntu 20.04 but Python deprecation was a hassle for me to continue so I continued with 18.04.6 for now bare in mind that 18.04 support is still valid for Ubuntu and it should reach end of life by April 2023.
This changelog is by the way worth reading. It contains a few WTF’s.
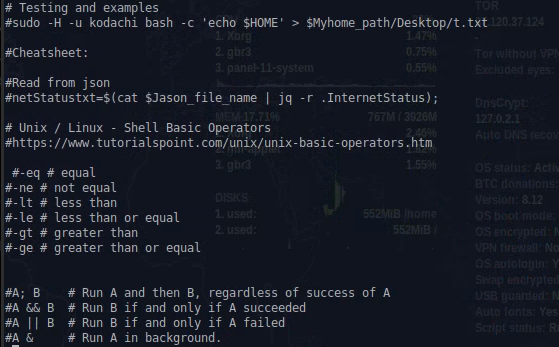
The bash scripts
The software that actually is Kodachi appears to be a collection of bash scripts in ~/.kbase/. The quality of these scripts makes me wonder. Some of the scripts contains a bash tutorial in the top of the scripts:
Let me show the snippet that generates the hardware hash:
First of all, this is unforgivable. This is data that uniquely identifies a computer, and he transmits that. If the computer is used for anonymity, this hash allows anyone controlling the end point to check if a user corresponds to a physical computer. And Al Maawali transmits this to his own server! Stay away from Kodachi, except as a exercise of how to not do things!
Second, this snippet indicates someone who doesn’t entirely know what they’re doing, with constructs such as g=[...], followed by e=$g for no obvious reason. The poor variable naming makes mistakes more likely, and reduces readability, which is important in security related software.
But the flipside is also that it doesn’t do what the author believes it does; it’s trivial to edit the script and replace this function with the following, which will return a random, unique hash each time, thereby removing his ability to block people:
It gets even better. Let’s look at how he handles networking:
    IP=$(cat $Jason_web_file_name| jq -r '.ServerFeed6[].Netcheckdomain1'|xargs);
    # Validate jsons here
    if [[ ! -n "$IP" ]]
    then
        netIP="mail.com";
        print_error "Failed to get json variable IP setting it to: $IP";
    fi
    echo "Switching domain to $IP";
    echo "Dhcclient the smart way";
    for i in $( nmcli device status | awk '{print $1}' );
    do
        if [[ $i != "DEVICE" ]]
        then
            echo "Dhcp for:$i";
            sudo timeout 60 sudo dhclient $i;

        fi
    done
fi
First of all, the messages printed doesn’t make sense. Switching domain to $IP? And no, dhclient ain’t the smart way. The system uses NetworkManager. He ignores this, and runs dhclient directly. In addition, he runs it for every interface. Including lo, the loopback interface. And for good measure, he uses sudo timeout 60 sudo[...]? Why the double sudo?
This in fact leads me to the fact that this distro has enabled passwordless sudo for the default user. Why? This reduces security in my opinion. Sure, it’s more convenient, but in a security and privacy focused distribution, the author should not make such choices for the user – and the author should not make the system depend on passwordless sudo.
In addition, there’s blatant abuse of sudo where it’s clearly not needed. There’s lines such as VPN_IP=$(sudo curl -s -m 30 $randomdomain ), where sudo serves no purpose. Is the author simply used to slapping on sudo in front of commands to make sure they work, without understanding whatsudo does…?
The ban function…
So he can ban users using his VPN if he considers them abusive. How does he accomplish that? Surely it has to be server side, right?
Nope. Just kidding! It’s handled client side.
function banAction()
{

    SERVICE='openvpn';
    if (ps ax | grep -v grep | grep $SERVICE > /dev/null)
    then
        sudo killall -SIGINT openvpn;

    fi

    SERVICE='tor-service';
    if (ps ax | grep -v grep | grep $SERVICE > /dev/null)
    then
        sudo killall tor;
    fi
So… he sends the HWID to the server, and if the server replies banned, the client politely kills all VPN connections. But it’s a bash script; it’s not exactly hard to comment out a few lines here and there.
This is a illustration of the level of brokenness in Al Maalawi’s security thinking – he doesn’t understand that you can’t trust the client in such a scenario. Would you seriously trust this guy to handle your security?
Utter lack of firewall!
One of the biggest problems is that there’s no firewall configured. Nil, zip, nada. Heck, it has postfix installed and listening!
This is from a different computer on the same subnet. What possible rationale does this decision have? It’s a security risk. There’s no meaningful scenario where this is wanted on a computer used to anonymously connect to the Internet. It’s only ever relevant on an e-mail server.
In addition, Kodachi doesn’t block traffic before the VPN services is up. It should! A firewall dropping incoming packages would also increase safety in case something listens by mistake – think defense in depth. A configured firewall would mitigate the by-default listening Postfix – although I’d expect the author to have better control over configured services than he shows.
The security score
Kodachi gives you a 0-100 score, supposedly to inform you how secure you are. The problem is, of course, that it doesn’t really tell you anything! Consider the following:
SERVICE='tor-service';
  if (ps ax | grep -v grep | grep $SERVICE > /dev/null)
    then
    theModel="ISP->VPN->Tor";
    securityScore=$((securityScore+30))
Kodachi doesn’t test if tor is actually in use; it’s enough that it’s running. Or how about firewall?
if(sudo ufw status |grep tun0 > /dev/null)
    then
          securityScore=$((securityScore+2));
fi
Too bad if the interface gets renamed to tun1. It also doesn’t check if the rules is sensible; just that some rule contains tun0 somewhere. A allow any from any with tun0 as comment will bump the score.
As it is, this number is largely meaningless. A secure system can score 0, and a secure system can score 100. At the best it’s not useful. At the worst, it’s actively harmful because a user may be mislead by a good score.
Apparmour
As it’s based off Ubuntu, Kodachi comes with Apparmour. Sadly, it only uses the default profile available in Ubuntu, with no adaptations. Apparmour could be a valuable piece of Defense in Depth, ensuring that a problem in a browser can’t compromise the entire system, by e.g. restricting the browser to read and write to a defined set of directories. This is, sadly, not done.
Discord is the point of contact.
The guy hangs out in a discord chat. The more privacy conscious people I know won’t touch discord with a 10 feet pole. Not having a IRC channel seems like a strange choice – although it doesn’t affect the security of the distribution, it’s indicative of the mindset of the author. In addition, it’s obviously a single author, not a community or group of people.
Summary
This is what I found in a couple of hours of looking. Some of the findings are serious, some merely indicate carelessness from the creator of the system – indicating that he doesn’t have good knowledge in security. The bash scripts indicates someone who has no programming background, and no Linux administration background, with strange constructs such as using NetworkManager to fetch a list of devices – but does not use NetworkManager to configure them, calls dhclient for loopback interface, and so forth.
Many of the choices won’t affect a security conscious user, but they will allow a novice to configure the system in a insecure state. More choices available essentially means that people can make more mistakes. Tails has recognized this, and provides a secure baseline, that’s not easy to break apart. Where tails allows for insecure configuration, the documentation clearly warns about this. The documentation for Kodachi is severely lacking, both in content and in warnings.
I could probably find more problems if I spend more time looking, but it’s simply not worth it. What I’ve found removes all trust in the author, and the advice is simply to stay far, far away from this piece of software. It’s not secure, and the author doesn’t know how to secure a system.
In short: Do not use Kodachi. There’s other that’s better:
They differ somewhat in scope and functionality. Read the documentation, and find the one that suits you. All of them have active communities. But stay away from Kodachi.
I recently bought a 7-port USB3 hub from eBay. That’s a somewhat interesting experience. It turns out that’s it’s not a 7-port USB3 hub. It’s a four port USB3 hub, and a three port USB2-hub, which happens to be mounted on the same board.
Inside, it contains two major IC’s:
VLI VL815 ChipSL2.1 USB2 HUB
One of them, the VL815, appears to be a USB3 hub chip, from VIA. The other chip, SL2.1 is a obscure USB2 hub chip, with a datasheet only in chinese – but at least clearly marked as USB2, both on the chip, and in the datasheet.
This is clearly not some accident in manufacturing; they’re making a fraudulent product, with some USB3 ports, and some USB2 ports – and hope that their customers won’t be able to tell the difference. The physical ports are all USB3, with the five extra contacts – just not connected to anything…
It amazes me that anyone goes to this length to shave of cents on a design – and it clearly works in the majority of the cases, otherwise they’d stop selling it quickly…
Update: After contacting the seller, I got this fantastic reply:
Sorry I think it is a faulty one, may be the packing colleague did not check carefully before packing, we will make a full refund for you,please check your paypal later, thanks.
So, they accidentally didn’t check that their design was a design that was totally wrong… Sorry, this defies belief. It’s not a mistake, it’s a deliberate design choice. At least they gave a full refund…
I assume that you have a running Ubuntu installation. This is written with 16.04 in mind but should work with some adaptions on other versions as well.
example.org is used as an example (D’oh) in this post, and should be changed to suit your installation.
First, we define the primary ServerName. This is the domain used to access the site. Only one can be defined per vhost. In addition, we define a ServerAlias, in case someone enters www.example.org in their browser. This ensures that Apache replies to both names. Both names has to point to your server, either in DNS, or in /etc/hosts for local testing.
Any number of server aliases can be specified, and they do not have to contain parts of the ServerName. Thus, ServerAlias example.com would be valid.
Create the new DocumentRoot
I’ve placed the new documentroot in /var/www/html/example.org. This is a location that is allowed to be served by Apache in Ubuntu. If I, for instance, placed it in /srv/, I would have to include a Directory stanza for it. For now, create the webroot, fill it with some content, and activate the new config:
$ sudo mkdir /var/www/html/example.org
$ echo "This is a test" | sudo tee /var/www/html/example.org/index.html
$ sudo a2ensite 01-example.org.conf
$ sudo service apache2 reload
If you now visit http://example.org, you should see the output *This is a test”. Congratulations! Your first vhost is running!
Install letsencrypt and grab certificates
To receive certificates from Let’s Encrypt, we need a client. The letsencrypt package included with 16.04 is ancient, so we need a ppa for this.
Select the domain you want to get a certificate for and follow the on-screen instructions by certbot. When asked if you want to redirect, select redirect if you want https only, and no redirect if you want both http and https. Today, there’s almost no reason to not redirect.
Please choose whether or not to redirect HTTP traffic to HTTPS, removing HTTP access.
-------------------------------------------------------------------------------
1: No redirect - Make no further changes to the webserver configuration.
2: Redirect - Make all requests redirect to secure HTTPS access. Choose this for
new sites, or if you're confident your site works on HTTPS. You can undo this
change by editing your web server's configuration.
-------------------------------------------------------------------------------
Select the appropriate number [1-2] then [enter] (press 'c' to cancel):
Try visiting http://example.com again – it should change to show that it is secure.
Congratulations, you have not set up apache2 with a valid TLS certificate that ensures traffic is encrypted!
Install WordPress
Next step is to install some application. I’ve picked WordPress as example to install.
First become root by entering sudo -i. Next, change directory to your webroot, and download, unpack and change ownership to Apache’s user:
You will now have a WordPress instance at https://example.com/wordpress/ – let’s go there.
The wizard tells you that you need a MySQL table, user, and password. Let’s make them!
By default, Ubuntu will use unix socket authentication for MariaDB. Thus, to log in to MariaDB as root, you have to use
sudo mysql -u root
or run the command in a root shell (for instance sudo -i). This will log you in without entering any password
# mysql -u root
Welcome to the MariaDB monitor.  Commands end with ; or \g.
Your MariaDB connection id is 32
Server version: 10.0.33-MariaDB-0ubuntu0.16.04.1 Ubuntu 16.04
Copyright (c) 2000, 2017, Oracle, MariaDB Corporation Ab and others.
Type 'help;' or '\h' for help. Type '\c' to clear the current input statement.
MariaDB [(none)]> CREATE DATABASE wordpress_db;
Query OK, 1 row affected (0.00 sec)
MariaDB [(none)]> GRANT ALL PRIVILEGES ON `wordpress_db`.* TO 'wordpress_user'@'localhost' IDENTIFIED BY 'passw0rd';
Query OK, 0 rows affected (0.01 sec)
MariaDB [(none)]> exit
Fill in the username wordpress_user, databasename wordpress_db and password passw0rd in WordPress’ configuration. That’s basically it; the rest is about following WordPress’ installation guidelines.
To add more vhosts, simply start from “Setting up a vhost”.
So, I’m talking to the Trådfri GW. It turns out that my initial research was correct. It is talking coaps. I used californium.tools/ to talk to it, requesting coaps://10.0.3.25/.well-known/core. It actually seems to implement the standard rather well 🙂 I had to use -psk and enter the security key, printed on a label under the gw itself.
UPDATE: Leave PSK identity blank.
==[ CoAP Response ]============================================

MID : 115

Token : 170a801bb0362002

Type : ACK

Status : 2.05

Options: {"Content-Format":"application/link-format"}

Payload: 560 Bytes

---------------------------------------------------------------

<//15001/65536>;ct=0;obs,<//15001/65538>;ct=0;obs,<//15001/65537>;ct=0;obs,<//15004/139121>;ct=0;obs,<//15005/139121>;ct=0;obs,<//15005/139121/203361>;ct=0;obs,<//15005/139121/221937>;ct=0;obs,<//15005/139121/217246>;ct=0;obs,<//15005/139121/202872>;ct=0;obs,<//15001>;ct=0;obs,<//15001/reset>;ct=0,<//status>;ct=0;obs,<//15005>;ct=0;obs,<//15004>;ct=0;obs,<//15004/add>;ct=0,<//15004/remove>;ct=0,<//15006>;ct=0;obs,<//15011/15012>;ct=0;obs,<//15011/9034>;ct=0,<//15011/9030>;ct=0,<//15011/9031>;ct=0,<//15011/9063>;ct=0,<//15011/9033>;ct=0,<//15010>;ct=0;obs

===============================================================

Time elapsed (ms): 1251
Querying each of the endpoints yielded the following:
/15001/65536
{"9054":0,"9001":"Remote","5750":0,"9002":1490983329,"9020":1490985746,"9003":65536,"15009":[{"9003":0}],"9019":0,"3":{"1":"TRADFRI remote control","0":"IKEA of Sweden","2":"","3":"1.1.1.1-5.7.2.0","6":3,"9":100}}
This is obviously the remote control unit.
/15001/65538
{"9054":0,"9001":"K","5750":2,"9002":1490992930,"9020":1491052948,"9003":65538,"9019":0,"3":{"1":"TRADFRI bulb E27 WS opal 980lm","0":"IKEA of Sweden","2":"","3":"1.1.1.1-5.7.2.0","6":1},"3311":[{"9003":0}]}
This is one of the bulbs. I believe it is the one named “K” in the IKEA app… 🙂
/15001/65537
{"9054":0,"9001":"LR","5750":2,"9002":1490983446,"9020":1491055861,"9003":65537,"9019":1,"3":{"1":"TRADFRI bulb E27 WS opal 980lm","0":"IKEA of Sweden","2":"","3":"1.1.1.1-5.7.2.0","6":1},"3311":[{"5850":1,"5851":254,"5707":0,"5708":0,"5709":33135,"5710":27211,"9003":0,"5711":0,"5706":"efd275"}]}
Another of the bulbs – I currently have two. This is obviously the one in the living room – LR. This is powered on, whilst the other one has main power removed. The powered on one (this) returns more data than the one that is powered down.
I have defined one group, containing both bulbs. The 9003 array contains the devices in this group (remote control and two bulbs).
/15011/15012
This is information about ntp server.
{"9023":"pool.ntp.org","9059":1491062713,"9060":"2017-04-01T16:05:13.055176Z","9062":0,"9061":0,"9066":0,"9029":"1.0.0004","9054":0,"9055":0,"9069":0,"9071":1}
You can change to your own ntp-server by issuing a set request, with pool.ntp.org replaced by your own. Quite neat actually.
This is one of the presets for mood lightning in the app. Reddish with low intensity.
Oookay, that’s enough about the endpoints. The rest is mostly a continuation. Let’s go back to the kitchen light, which I’ve now powered on, put to max level and bright white (highest color temperature). As expected it now replies with more data:
{"9054":0,"9001":"K","5750":2,"9002":1490992930,"9020":1491052948,"9003":65538,"9019":1,"3":{"1":"TRADFRI bulb E27 WS opal 980lm","0":"IKEA of Sweden","2":"","3":"1.1.1.1-5.7.2.0","6":1},"3311":[{"5850":1,"5851":254,"5707":0,"5708":0,"5709":24930,"5710":24694,"9003":0,"5711":250,"5706":"f5faf6"}]}
Dimmed to minimum:
{"9054":0,"9001":"K","5750":2,"9002":1490992930,"9020":1491052948,"9003":65538,"9019":1,"3":{"1":"TRADFRI bulb E27 WS opal 980lm","0":"IKEA of Sweden","2":"","3":"1.1.1.1-5.7.2.0","6":1},"3311":[{"5850":1,"5851":12,"5707":0,"5708":0,"5709":24930,"5710":24694,"9003":0,"5711":250,"5706":"f5faf6"}]}
Here, the parameter 5851 changed from 254 to 12. This is likely to be the light level output. Let’s try again, with the bulb set to 50%:
{"5850":1,"5851":127,"5707":0,"5708":0,"5709":24930,"5710":24694,"9003":0,"5711":250,"5706":"f5faf6"}
Yep, 5851 is the dimming level.
And now, repeat with different colour temperature (middle setting from app):
{"5850":1,"5851":127,"5707":0,"5708":0,"5709":30140,"5710":26909,"9003":0,"5711":0,"5706":"f1e0b5"}
The intensity is still 127, but three other parameters, 5709-5711. In addition 5706 changed – which it did not for the previous changes. Let’s try a put, changing the 127 to 254:
java -jar cf-client-1.1.0-APSHOT.jar -psk PUT coaps://10.0.3.25//15001/65538 '{"9054":0,"9001":"K","5750":2,"9002":1490992930,"9020":1491052948,"9003":65538,"9019":1,"3":{"1":"TRADFRI bulb E27 WS opal 980lm","0":"IKEA of Sweden","2":"","3":"1.1.1.1-5.7.2.0","6":1},"3311":[{"5850":1,"5851":254,"5707":0,"5708":0,"5709":30140,"5710":26909,"9003":0,"5711":0,"5706":"f1e0b5"}]}'

[...]

==[ CoAP Response ]============================================

MID : 190

Token : 4bde3ee89d815913

Type : ACK

Status : 2.04

Options: {}

Payload: 0 Bytes

===============================================================

Time elapsed (ms): 1487
Yup, promptly dimmed up. Sending only the 3311 did nothing – it appears I have to send the entire thing back to the bulb for some reason.
That’s it for now. Some pointers on how to talk to the lights.
Update: There’s some discussion at ha-bridge’s github about this topic. Also note the first comment – I didn’t include this information, but yes – the PSK identity should be left blank, and the key is the one printed on the label of the gw.
So, Ikea has released Trådfri seemingly worldwide. This is a series of Zigbee enabled lights, which looks quite neat. I bought the starter kit, with a gateway, two bulbs, and a remote control.
First a couple of sentences about the remote control. It has on/off, dim up and down, and change color temperature. Nothing too exciting. If it is paired with two bulbs, and one is on and other is off, they will swap when on/off is pressed… It appears to have the advertised range of 10m, and certainly is a neat addition.
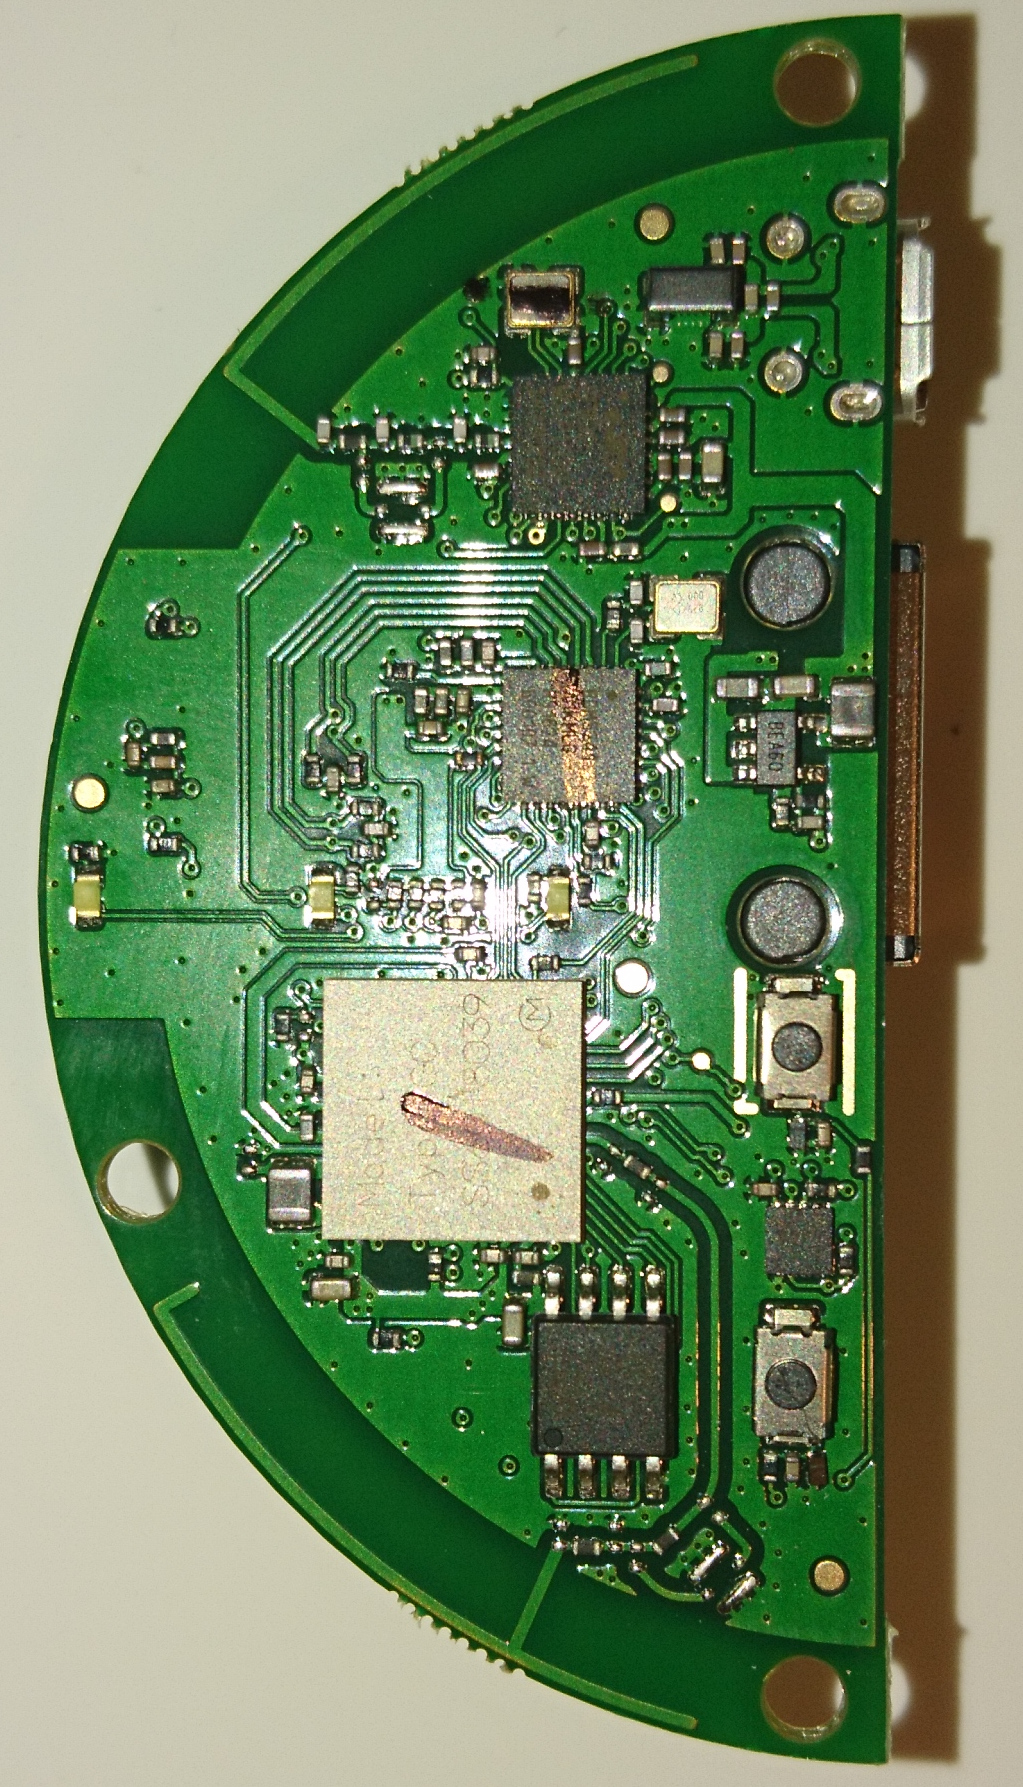
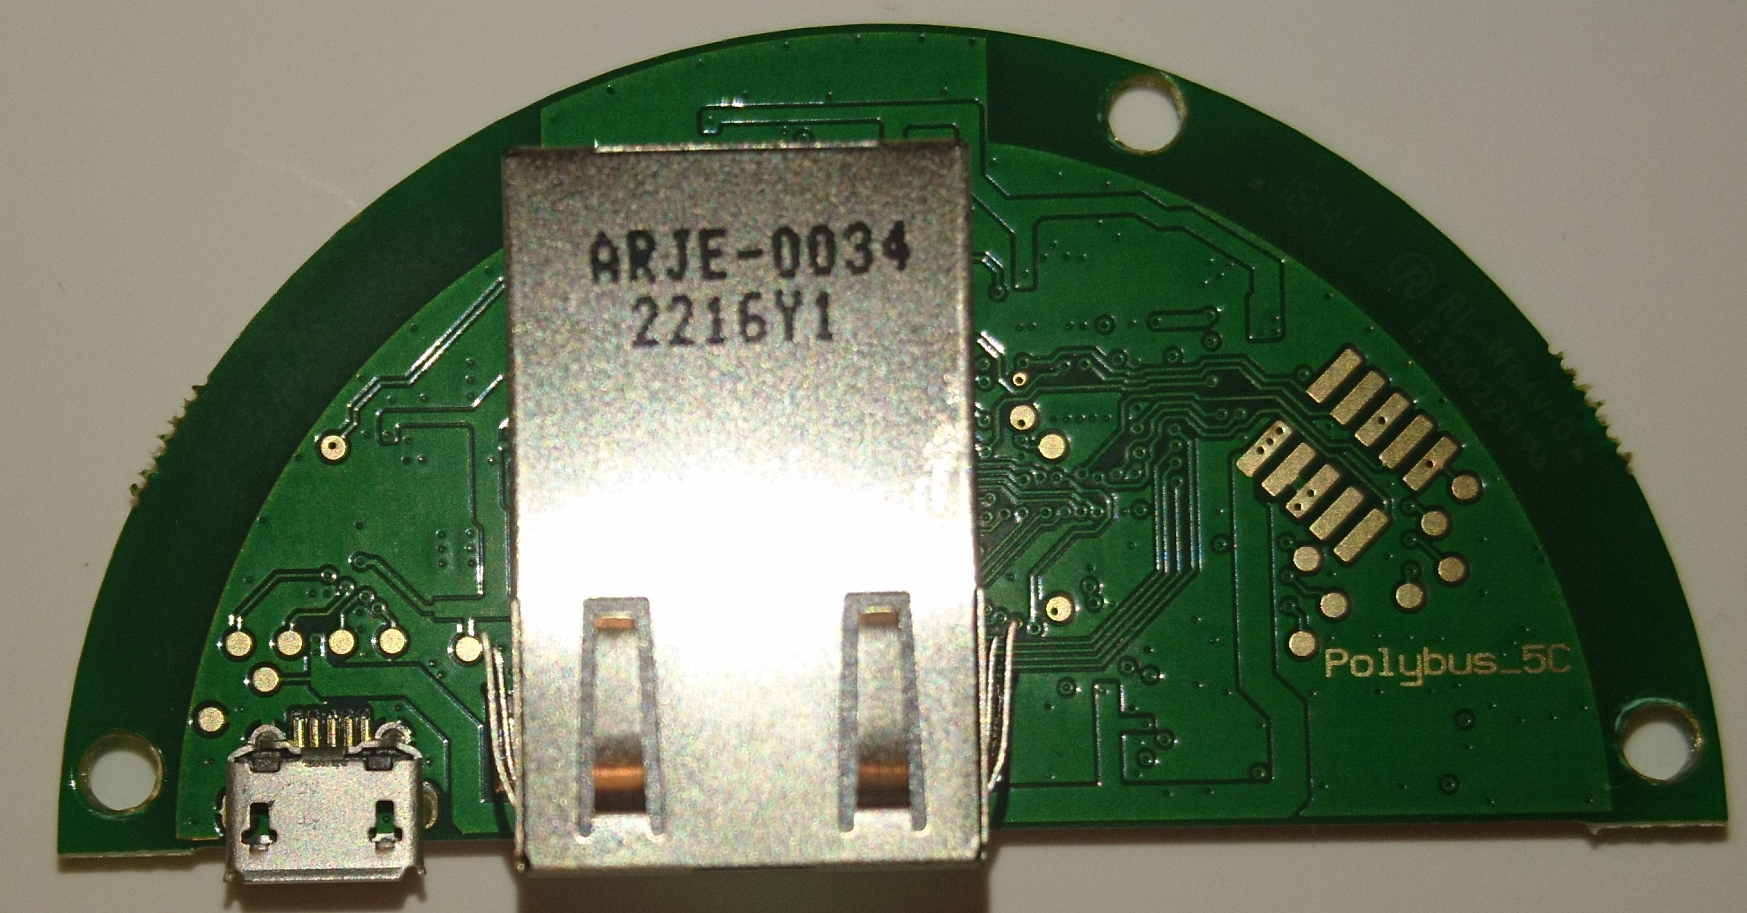
The bulbs gives the amount of light I expect – and they’re quite cheap. But the gateway is the most interesting thing. It’s a cylinder, containing ~95% air. The circuit board is imaged at left. The biggest comonent is the ethernet jack, mounted on the other side of the board:
Ethernet jack side of board
There’s not many components there… Notably two buttons: one reset, and one pair button.
I fired up the android application, which appears to be using multicast (224.0.0.1) to find the gateway, and then communicates using encrypted coap (coaps). A tcpdump can be found here. Not really interesting tho, except that I’m a little bit surprised that they bothered to include encryption. Also, it does not look like it attempts to talk to the Internet. I’ve not set up logging, but I’ve checked a few times, and the device has no outgoing connections – which is a good sign in my book.
The included app is fairly basic – you can create schedules for turning on and off, and you can control lights and create zones, and control zones. That’s it – so far. In short it does what it says on the box, but not much more. I’m looking at coap libraries for python now, but sadly dTLS support seems to be missing from most of them. Same goes for node.js coap libraries…
The Netgear readynas is essentially a x86 computer, with a handy Serial TTL interface at the back.
However, it’s not entirely straight forward. Unetbootin-created usb-media did not boot, but the debian netboot iso appears to boot. However, it doesn’t support serial console out of the box.
After remastering the netboot image with settings for console, I was ready to try again – holding the ‘backup’ button on front while powering up. And presto – a debian boot menu appeared. From thereon it was pretty straight forward. If you want, you can grab the image here – debian-8.2-serial.iso. It can we written to CD with your favourite recording software, or written to a usb stick with dd. For the Netgear, use a usb stick.
The performance went from 450Mbps to 950Mbps, so clearly the way outdated software that Netgear shipped it with was inadequate for the hardware.
So now I have a Debian computer, which can do anyting – not limited to what Netgear wanted me to do. And as a bonus it even performs better!
Some of you may have heard about rtl-sdr, which is basically a software defined radio framework, for cheap USB sticks. The USB sticks can be picked up for 10-20$.
They’re not excellent. They have limited bandwith (~2MHz), they have noticeable noise, and they don’t have that good sensitivity. But for the price? It’s a extremely good offer.
AIS reception has been covered by the guys at rtl-sdr.com. I found this quite lacking, and it didn’t explain some of the stuff, like why resample the audio to 12kHz.
After fiddling around for some days, I found rtl-ais which is a modified version of rtl-sdr, with direct support for AIS decoding. It worked! Just specifying the tuner error, and it was outputting AIS messages.
However, the decoder was not that elegant, and GNUAIS had interesting features, like the ability to feed data directly to mysql.
AIS is transmitted at 161.975 and 162.025MHz, which is within the 2MHz bandwidth of the RTL-SDR sticks, so both channels can be received at once. The rtl_ais software is a modified version of rtl_fm, which can do exactly this. Feeding the output audio to a named pipe, and setting gnuais up to read from that named pipe, instead of audio card, worked just perfectly!
As you may’ve guessed from some previous blog posts, I have been expirementing with Raspberry Pi as media player.
The setup was not entirely straight forward, as it was to be located at my girlfriends place, with access to the media I have at home.
I was looking at OpenVPN as solution, tying the networks together. She has ample down link (16Mb/s), and I have ample uplink (12Mb/s) to make this viable.
I started testing with my laptop as media player, and 720p played just fine from a NFS volume mounted over OpenVPN. A few glitches during playback if the connection was used for anything else whilst playing, but quite smooth and usable.
1080p, however, was no go. Low BW 1080p might work, but probably not. The solution for this was Plex, with a suitable plugin in XBMC. Plex handles on-the-fly transcoding to a more suitable bandwidth profile.
After testing a bit, my conclusion was that the solution was not performing well enough. Throughput was 2-3Mb/s over the OpenVPN-link. Originally I believed this was due to the limited CPU power of the Pi, but it turned out that the Edimax Wireless USB adapter was the culprit. When testing at home, it was placed 50cm from the antennas of my access point; not the setup at my girlfriends place. There it was 5 meters…
Changing to cabled gave a throughput of roughly what the link should be able to carry (11.5Mb/s according to Samknows), minus overhead. So actual throughput was 10.5-11Mb/s downstream, and 4.5-5Mb/s upstream, tested with iperf/.
Plex setting at 8Mb/s was working nice – if connection was not used for other stuff at same time. Right now it’s set to 4Mb/s, which leaves quite a bit of headroom for other stuff.
I run the OpenVPN in a bridged setup, to avoid routing or any such things – easier to integrate the two LAN’s in bridged mode. Performance is acceptable enough, and the added benefit is that I can use everything as if at home no matter where I am 🙂
Right now, it’s running on cable, and I’m looking for a cheap and good wireless stick, well supported by Linux…
(Oh. OpenVPN setup looks difficult, but it’s rather easy once you actually grok it. The client config file can be as short as this:
client

remote foobar.example.org

proto udp

dev tap0

ca ca.crt

cert client2.crt

key client2.key

script-security 2

up /etc/openvpn/update-resolv-conf

down /etc/openvpn/update-resolv-conf